AVR timers do more than count time

Timers/Counters are probably one of the most complex peripherals in microcontrollers, but they are most common no matter what complexity the program is. Designers of timers have put a lot of thought into them, making them very flexible and versatile for all timing-dependent tasks like measuring periods, generating PWM signals, generating output signals, and timed interrupts. Timers run independently from the AVR core. Once set, they do their silent job while AVR can do other tasks or go to sleep. AVR can read timer values or change operation modes whenever it needs or only can be interrupted with several available interrupts. If you see an application where the frequency is measured, music is generated, or motor is driven, a timer is involved.

Continue reading

Implementing AVR interrupts

Before we go to the code part, let’s what is needed to run interrupts successfully. These conditions apply to all AVR interrupts. First of all, we need to enable global interrupts by setting global Interrupts enable bit (I) in the SREG register. This is crucial as this bit enables or disables all interrupts in the AVR microcontroller. So each time you are setting up an interrupt, be sure this bit is enabled. The next thing is enabling individual interrupt bits on a particular peripheral control register. Without setting this bit – wanted interrupt won’t work either. And the last thing is to be sure that there are required conditions for an interruption to occur. For instance, if you set timer overflow interrupt, be sure this overflow will occur. Defining AVR interrupts Now we can get to some code as the practice is the best teacher. If you look at various C compilers, you’ll find that interrupt defining syntax may differ across them. This is mainly because compilers stay away from hardware-specific details, so it is up to the software developer…

Continue reading

Basic understanding of microcontroller interrupts

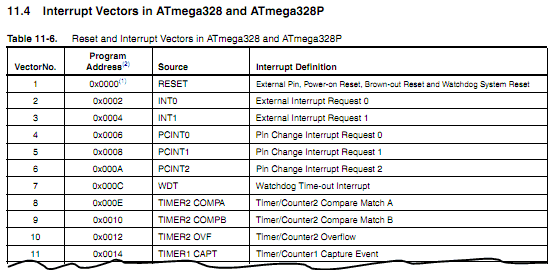
This tutorial is based on Atmega328 microcontroller, which is popular in Arduino boards. So you’ll be able to test all code examples on Arduino as it can serve as general purpose AVR test board with no problem. Understanding Interrupts Probably you won’t be able to find a microcontroller without interrupt capability. These are essential attributes of any modern microcontroller or processor. They may seem confusing and tricky at first glance, but during the time, you will find out that regular MCU operation is impossible without interrupts. Interrupts can be compared to real-life events. Look around – all your activities are full of them. For instance, you are reading this tutorial and find it interesting, so you are all in it. But suddenly, your cell phone rings. What do you do? You remember the last stroke you’ve read and answered the phone. One phone conversation is over; you return to your reading as if nothing happened. Well, this is only one example of interrupt to give some visual clue what interrupts are.

Continue reading

Controlling AVR I/O ports with AVR-GCC

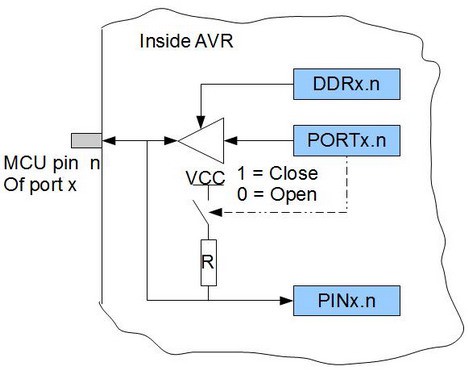
Controlling pins is one of the first things to learn when learning microcontrollers. It seems that each microcontroller type has its port logic. So before using them, it is essential to understand every detail so you can effectively use them in projects. Let’s see how ports are organized in AVR and how to successfully control them. Inside AVR port If you try to look into any AVR datasheet, you will find port drawing which may seem a bit complex at the start. But for a simple start, let’s look at simplified port pin schematic. x designates port (A,B,S,D,…); n designates pin number (0..7) As you can see, each port consists of three registers DDRx PORTx, and PINx (for instance, DDRA, PORTA, and PINA). When looking into this simple logic, we can see several variants of operation. To enable output to the pin, we need to write logic ‘1’ to DDx.n pin. This will enable buffer to let bit through from PORTx register. If the PORTx.n bit is ‘1’, then it can source a pin with VCC voltage and up to…

Continue reading

Setting up AVR development platform

You can be encouraged to use various types of AVR development tools. Most of them cost money to get full functionality and support. All they are great tools out of the box with fast support that you have to pay. Of course, you can give it a try with their limited versions to see capabilities. As we mentioned before, we will use free tools that are great enough compared to commercials. UPDATE! Here are the currently supported software options for AVR microcontroller development: WinAVR or AVR-GCC tools WinAVR is a toolset for C programming the AVR microcontrollers. It is a bunch of small programs that make development as comfortable as possible. The main tools are avr-gcc compiler, avrdude programmer, avr-gdb debugger, and more. These are command-line tools, so you need to integrate them into some integrated development environment (IDE). There can be any IDE supporting external tools like Eclipse and, of course AVRStudio that we will be using. Besides, WinAVR comes with great program writing tool – Programmers Notepad. Actually, with WinAVR, you can write, compile, upload to chip, and…

Continue reading

Choosing AVR programmer

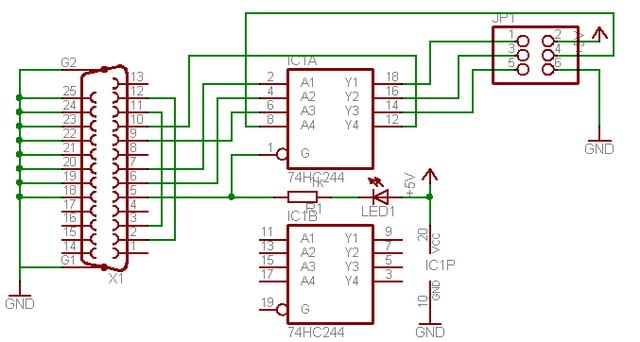
There are many AVR programmers to choose from. The simplest ones are bitbang programmers. These are straightforward programmers that can be built with as few components as few resistors (or no resistors at all). These can be COM, LPT, or USB-to-TTL converter based. DIY Bitband programmers Example of LPT port programmer These are probably the simplest to build, as there is no need to convert any signals from the port. Buffer chip is used only for safety reasons to protect computer port. Even simpler programmer cable can be found here.

Continue reading