Implementing precise single shots with AVR timer

Microcontroller timers are meant to count clock cycles in hardware, and there are many ways and configurations where timers are handy. First of all, timers are meant to work purely in hardware without utilizing CPU. Secondly, timers help generate waveforms like PWM, trigger events, count the time between events, etc. But there is one use that, in most cases, is missed and not documented – precise single shots that allow generating only a single pulse shot with precise length. And this method doesn’t require CPU to be involved – just set and forget. The idea of this method lies in using fast PWM (refer to datasheet for more info) mode a bit differently. Normally in this mode timer works by counting to TOP value; somewhere in between, there is a MATCH value where timer outputs HIG and drops to LOW when TOP is counted. This way, there is a PWM signal generated. Josh came up with the idea that, in this case, we can generate only single pulse by setting MATCH value above the TOP and setting the initial timer…

Continue reading

USB oscilloscope using STM32

This is a basic oscilloscope on STM32F103C8T6 microcontroller. The circuit board is kept very simple. No fancy analog stuff – just diode protection circuit and resistor divider. It is a two-channel 8-bit scope with 300kSps each. It accepts voltage levels from 0 to 6.6V. Data stream via USB is live and goes to PC GUI called mini scope v4.Here you have some basic controls, including sampling rate, triggering source and level, buffer size, and other handy stuff. Building a custom USB oscilloscope might seem like a fun project, it can be a lot of work and may not be worth the effort for most people. Here are a few reasons why: All that being said, if you’re really passionate about electronics and want to learn more about how USB oscilloscopes work, building your custom USB oscilloscope can be a gratifying project. Just be prepared for a lot of hard work and possibly some frustration along the way!

Continue reading

Connecting multiple I2C devices on a common bus

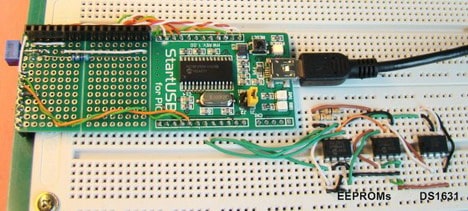
The I2C communication protocol is so popular today that you can buy varieties of I2C-compatible devices in the form of temperature sensors, serial EEPROMs, real-time clocks, LCD drivers, port expanders, and so on. While most modern microcontrollers do have built-in I2C communication ports, its implementation requires a good understanding of the protocol in general, its signal types, and an addressing scheme for uniquely identifying multiple devices on a common I2C bus. Embedded Lab’s new tutorial on I2C communication covers all the detail that is required for connecting multiple devices on a common I2C bus. The tutorial uses the PIC18F2550 microcontroller, to which is connected three I2C compatible devices: 2 EEPROMs (24LC512) and one temperature sensor (DS1631). In the experiment, the microcontroller receives the temperature readings from DS1631 sensor and stores them in the two EEPROMs. Later, the readings are retrieved from the EEPROMs and displayed on an LCD screen. More about I2C capabilities The number of I2C devices that can be connected to a microcontroller depends on the number of available I2C bus lines, the addressing scheme used by the…

Continue reading

A DDS function generator using an ATmega16

I still remember the piece of a rectangular box with many buttons labeled 1kHz, 10kHz, 100kHz, 1MHz, and everything else in between. Oh, it also has a knob connected to a dial dividing a sector into a hundred parts with a series of 7 segments changing dial every time a button is fired– just like old school radio we see at StarTrek. We commonly call it the function generator, and it’s usually used to inject square waves into your circuits – what for? Mostly for clocking. Here’s a new implementation of the AVR DDS function generator 2.0 (scienceprog.com); it has a different board layout and uses only through-hole components for easy construction. It has two outputs, one for a +-5V signal source and the other for a 0-10V signal source; the voltage levels of the two outputs are reconfigurable using two separate potentiometers. Like the original version, it incorporates a 2×16 LCD screen and pushes buttons for control – press a button to start and stop the signal generation. The circuit’s DAC is just a simple R-2R ladder controlled by…

Continue reading

The S.M.A.R.T. HVAC Monitor!

Many people always claim how smart and intelligent they’re in the electronics niche. If you’re one of those with the talent, would you dare try to create this S.M.A.R.T. HVAC monitor? As already mentioned earlier, an HVAC monitor is a project that involves making a S.M.A.R.T. (Self-Monitoring, Analysis, and Reporting Technology) Thermostat. It can access the internet without any further modification! Well, this project had already combined several elements of embedded electronics, and it keeps on the theme of Home Automation. By using the S.M.A.R.T. HVAC monitor, you’ll have the chance to control and monitor the HVAC system via the web. Furthermore, it could be easily interfaced with most commercial and residential systems. It is important to keep the furnace in working condition. This is why you might need to partner with Furnace Repair Whitby. The project is based on a PIC18F452 capable of using the standard 2-wire hardware I2C. You’ve to figure out a way to overcome the slight downside here, as these pins were not made available on the extension header, as the PIC-WEB uses I2C on-board to…

Continue reading

DIY The 6 Digit LED 7-Segment Multiplexing is Easy as ABC!

A 7-segment display is an elementary but practical electronic component that you can use to display numbers and sometimes letters. It’s just seven little LEDs arranged in a specific pattern that makes it easy to read numbers. Using 7-segment displays has several benefits. They are simple to interface with microcontrollers and require very few input/output pins. They are also easy to read and can display numeric characters clearly, making them a popular choice for digital clocks, calculators, and other devices that require numerical output. Additionally, they are relatively inexpensive and widely available, making them a cost-effective solution for many applications. Finally, 7 segment displays can be used in indoor and outdoor environments and are available in various sizes and colors to suit different needs. The seven segments are arranged in the shape of a rectangle, with a small eighth segment at the bottom for the decimal point. Turning on different combinations of the seven segments allows you to display all the numbers from 0 to 9. One of the great things about 7-segment displays is that they’re straightforward to use…

Continue reading