In the last part of the tutorial, we have covered simple USART routines that send data directly to USART peripheral. This is OK to use such an approach when a project isn’t time-critical and processing resources are far from limits. But most often, we stuck with these limiting factors, mainly when RTOS is used or when we perform necessary real-time data processing. And having USART routines with while the loop-based wait isn’t a good idea – it steals processing power only to send a data.
As you may guess – next step is to employ interrupts.
As you can see, there are many sources to trigger interrupts, and each of them is used for a different purpose. To use one or another interrupt, first, it has to be enabled in USART control register (USART_CR1, USART_CR2, or USART_CR3). Then NVIC USART_IRQn channel has to be enabled to map interrupt to its service routine. Because NVIC has only one vector for all USART interrupt triggers, service routine has to figure out which of interrupts has triggered an event. This is done by checking flags in USART status register (USART_SR).
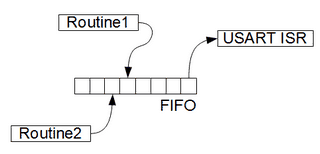
Another important thing about using interrupt-based transmission is buffering. Using interrupts is a “set and forget” method, and it is a bit hard to predict when it will occur, especially when a system is complex with multiple different priority interrupts. It can be a situation when higher priority preempts USART interrupt during transfer and tries to send data via same USART channel. Without buffering, this might become impossible.
As you can see, we can continue stacking data FIFO buffer and once USART interrupts routine gets its control it will transmit accumulated data. Then only problem here that may occur is a buffer overflow – so make sure that FIFO is large enough to deal worth case scenario when the buffer gets overfilled. No more data can be accepted, leading to loss of bytes until USART interrupt routine gets chance to sip few bytes off.
In the following example, we are going to create s simple FIFO implementation that allows us to create send and transmit buffers. For this, we create another two files in the project – buffer.c and buffer.h. In header file we define FIFO_TypeDef type:
typedef struct{
    uint8_t in;
    uint8_t out;
    uint8_t count;
    uint8_t buff[USARTBUFFSIZE];
}FIFO_TypeDef;
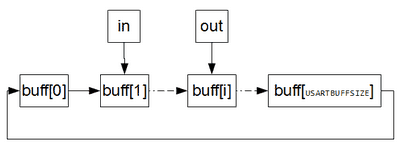
Members of this structure are as follows:
in – indicates input data location. It points to last written data to buffer;
out – indicates next data byte to be sent via USART;
count – indicates the number of bytes currently stored in FIFO;
buff[] – array storing data;
USARTBUFFSIZE – is the size of FIFO.
Having all this, we can create a simple circular FIFO or so-called ring buffer:
First of all, when FIFO is created we have to initialize it by setting initial values of indexes and count:
void BufferInit(__IO FIFO_TypeDef *buffer)
{
buffer->count = 0;//0 bytes in buffer
buffer->in = 0;//index points to start
buffer->out = 0;//index points to start
}
This will give us an empty buffer.
Next follows writing a byte to buffer:
ErrorStatus BufferPut(__IO FIFO_TypeDef *buffer, uint8_t ch)
{
if(buffer->count==USARTBUFFSIZE)
    return ERROR;//buffer full
buffer->buff[buffer->in++]=ch;
buffer->count++;
if(buffer->in==USARTBUFFSIZE)
    buffer->in=0;//start from beginning
return SUCCESS;
}
As you can see, before writing to the buffer, we must ensure it is not complete. If it is full we return error – in the program, this would mean the loss of data (if no special care is taken). Otherwise, if the buffer isn’t full, then it adds a byte to the end (tail) of the queue and increases element count. And since this is a circular buffer, once index reaches the end of an array; it cycles to the beginning. The similar situation is with a reading from buffer:
ErrorStatus BufferGet(__IO FIFO_TypeDef *buffer, uint8_t *ch)
{
if(buffer->count==0)
    return ERROR;//buffer empty
*ch=buffer->buff[buffer->out++];
buffer->count--;
if(buffer->out==USARTBUFFSIZE)
    buffer->out=0;//start from beginning
return SUCCESS;
}
ErrorStatus BufferIsEmpty(__IO FIFO_TypeDef buffer)
{
    if(buffer.count==0)
        return SUCCESS;//buffer full
    return ERROR;
}
Here we first check if there is data in the buffer and return the error if it is empty. If data is present in FIFO, then we take the first byte from the beginning (head) of FIFO and decrease the count of data in it and update the index.
Continuing with our example, we are going to update the code that does the same task but using buffers and interrupts.
First of all, we implement buffers – one for receiving data and another for transmitting:
//initialize buffers
volatile FIFO_TypeDef U1Rx, U1Tx;
And in USART1Init function we add couple lines where these buffers are initialized:
BufferInit(&U1Rx);
BufferInit(&U1Tx);
Since we are going to use interrupt based USART communication we also have to enable NVIC channel for USART1 by toUSART1Init() the following:
//configure NVIC
NVIC_InitTypeDef NVIC_InitStructure;
//select NVIC channel to configure
NVIC_InitStructure.NVIC_IRQChannel = USART1_IRQn;
//set priority to lowest
NVIC_InitStructure.NVIC_IRQChannelPreemptionPriority = 0x0F;
//set subpriority to lowest
NVIC_InitStructure.NVIC_IRQChannelSubPriority = 0x0F;
//enable IRQ channel
NVIC_InitStructure.NVIC_IRQChannelCmd = ENABLE;
//update NVIC registers
NVIC_Init(&NVIC_InitStructure);
//disable Transmit Data Register empty interrupt
USART_ITConfig(USART1, USART_IT_TXE, DISABLE);
//enable Receive Data register not empty interrupt
USART_ITConfig(USART1, USART_IT_RXNE, ENABLE);
We simply enable USART1_IRQn channel with 0 priority and 0 sub-priority. The next thing is to decide which interrupt sources will be used to trigger transmission and reception. For the reception, it is evident that Received Data Ready to be Read (RXNE) interrupt will rise once data from receive shift register is transferred to USART_DR data register. So during this interrupt, we simply need to read out the value from it. A bit different situation is with transmitting. For this, we are going to use Transmit Data Register Empty (TXE) interrupt source to trigger the transfer. This interrupt raises every time the contents of the data register is transferred to the output shift register meaning readiness for another byte to transfer. Initially, we disable this interrupt because we don’t need to trigger it since we don’t have anything to send.
Now we can modify byte send function:
void Usart1Put(uint8_t ch)
{
    //put char to the buffer
    BufferPut(&U1Tx, ch);
    //enable Transmit Data Register empty interrupt
    USART_ITConfig(USART1, USART_IT_TXE, ENABLE);
}
It simply adds a byte to buffer and then enables TXE interrupt so it could be triggered to transmit. The similar situation is with reading byte function:
uint8_t Usart1Get(void){
    uint8_t ch;
    //check if buffer is empty
    while (BufferIsEmpty(U1Rx) ==SUCCESS);
    BufferGet(&U1Rx, &ch);
    return ch;
}
There we need to check if there is data in the buffer. A simple helper function BufferIsEmpty() checks if FIFO is empty by reading buffer count value and returns SUCCESS if it is empty. If it is empty we simply wait for data to be received. Once it’s here it is passed to a variable and returned.
And the last thing we have to do is to write our interrupt handler where all magic happens:
void USART1_IRQHandler(void)
{
    uint8_t ch;
    //if Receive interrupt
    if (USART_GetITStatus(USART1, USART_IT_RXNE) != RESET)
    {
        ch=(uint8_t)USART_ReceiveData(USART1);
            //put char to the buffer
            BufferPut(&U1Rx, ch);
    }
    if (USART_GetITStatus(USART1, USART_IT_TXE) != RESET)
    {
            if (BufferGet(&U1Tx, &ch) == SUCCESS)//if buffer read
            {
                USART_SendData(USART1, ch);
            }
            else//if buffer empty
            {
                //disable Transmit Data Register empty interrupt
                USART_ITConfig(USART1, USART_IT_TXE, DISABLE);
            }
    }
}
As I mentioned before first of all, we need to clear out which event triggered an interrupt. This is done by checking flags in the status register. This is done with
USART_GetITStatus(USART1, USART_IT_RXNE)
Function, which checks the selected flag and returns logical ‘1’ if a particular flag is set. Then the conditional code is executed. So if we get receive (RXNE) interrupt then we read the data value from USART data register and place it in to receive buffer.
If we find that this is transmitted interrupt (TXE), then we take data byte from buffer and place into USART data register to send. And once transmit buffer is empty (TXE), an interrupt is disabled to avoid chain interrupt triggering. And this practically it. The same example from part1 works fine. I modified the code so that it works either in buffered and in non-buffered without interrupts mode. All you need to comment or comment out
#define BUFFERED
in usart.h file. If you need more info about print format check out the post on AVR I/O tutorial Or follow any external source like this.
Download CodeSourcery+Eclipse project files here to give it a try: STM32DiscoveryUsart


Hello,
Thanks for the tutorial, I was wondering if you had any success programming the STM32 using the USART and on board bootloader, rather than the JTAG.
Have you tried that before? would appreciate sharing your experience 🙂
Thanks!
STM32 comes with built in bootloader. Use Flash Loader Demonstrator program to upload hex.
ErrorStatus BufferIsEmpty(__IO FIFO_TypeDef buffer)
{
if(buffer.count==0)
return SUCCESS;//buffer full
return ERROR;
}
can be modified to this one (pass by reference)
ErrorStatus BufferIsEmpty(__IO FIFO_TypeDef *buffer)
{
if(buffer->count==0)
return SUCCESS;//buffer full
return ERROR;
}
Thank you, all! The article says, that “NVIC has only one vector for all USART interrupt triggers”.
I think we need to clarify that there are more than one USARTS. And each of them has separate IRQ line and own weak linked IRQ handler.
I am afraid, that this code contains a bad race condition regarding cnt. The ++ operation is not atomic so the read, plus, write might be interrupted by an access from the ISR. Depending on the direction, the buffer looks full, because it is not decremented correctly, or looks empty, because it is not incremented correctly.
How did you configured eclipse