You can be encouraged to use various types of AVR development tools. Most of them cost money to get full functionality and support. All they are great tools out of the box with fast support that you have to pay. Of course, you can give it a try with their limited versions to see capabilities. As we mentioned before, we will use free tools that are great enough compared to commercials.
UPDATE!
Here are the currently supported software options for AVR microcontroller development:
- Atmel Studio: an integrated development environment (IDE) provided by Microchip Technology, which includes a C/C++ compiler, a debugger, and a programmer. The latest version is 7.0, released in 2016.
- MPLAB X IDE: Microchip’s latest IDE supports AVR microcontrollers and other Microchip devices. It includes a C/C++ compiler, a debugger, and a programmer.
- Arduino IDE: a popular open-source IDE that supports AVR microcontrollers and is commonly used in hobbyist and educational projects.
- PlatformIO: an open-source cross-platform IDE that supports AVR microcontrollers and other embedded platforms.
- CodeVisionAVR: a commercial IDE that includes a C compiler, an assembler, and a debugger. The latest version is 3.29, released in 2017.
- IAR Embedded Workbench: a commercial IDE that includes a C/C++ compiler, a debugger, and a profiler, and supports AVR microcontrollers.
- CrossWorks for AVR: a commercial IDE that includes a C/C++ compiler, a debugger, and a profiler, and supports AVR microcontrollers.
WinAVR or AVR-GCC tools
WinAVR is a toolset for C programming the AVR microcontrollers. It is a bunch of small programs that make development as comfortable as possible. The main tools are avr-gcc compiler, avrdude programmer, avr-gdb debugger, and more. These are command-line tools, so you need to integrate them into some integrated development environment (IDE). There can be any IDE supporting external tools like Eclipse and, of course AVRStudio that we will be using. Besides, WinAVR comes with great program writing tool – Programmers Notepad. Actually, with WinAVR, you can write, compile, upload to chip, and even debug your firmware either in the emulator or via hardware debugger. As we will only use compiler with different IDE, we won’t be going into more details. Ah, probably you will find some rumors that WinAVR-20100110 is the last release of this great tool. Eric Weddington (maintainer), also a Product Manager at Atmel, will probably shift this product to official ATMEL release. This won’t affect the following tutorial as it still will be based on the same avr-gcc compiler. Install, use it, and don’t worry.
NOTE!
WinAVR was a popular open-source toolchain for AVR microcontroller development that included a collection of utilities such as a C/C++ compiler, an assembler, and a programmer. It was based on the GNU Compiler Collection (GCC) and was widely used in the AVR community.
One of the strengths of WinAVR was its open-source nature, which allowed developers to modify and customize the toolchain to their needs. It was also free to use, which made it accessible to hobbyists and students who were just starting in embedded programming.
However, WinAVR was discontinued in 2010 and is no longer actively maintained. One of the reasons for its discontinuation was the emergence of more modern and powerful development tools, such as Atmel Studio and MPLAB X IDE, which provide better integration with hardware tools and offer more features and functionality.
Another reason for WinAVR’s discontinuation was the fact that the AVR microcontroller family was acquired by Microchip Technology in 2016. Microchip has since focused on developing its tools and ecosystem for AVR microcontrollers, such as Atmel Studio and MPLAB X IDE.
Overall, while WinAVR was an excellent option for AVR microcontroller development at the time of its release, it has since been replaced by more modern and capable tools.
AVRStudio – also free and powerful
We are going to use AVRStudio intensively during this tutorial, so get used to it. It is an excellent IDE with lots of useful features like an editor, debugger and programmer. It has ASM compiler ready to go and plugin that supports avr-gcc compiler from WinAVR. When you install both winAVR and AVRStudio, you are prepared to go. Let’s go through the process and compile our first program.
The first program in AVRStudio
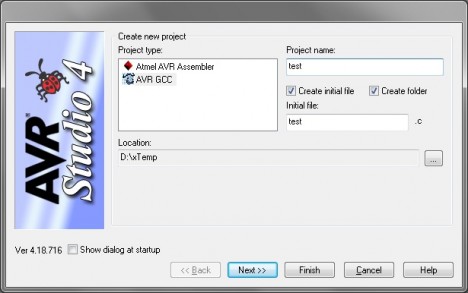
Launch AVRStudio create New Project by selecting menu Project->New Project. You should see the following window pop-up:
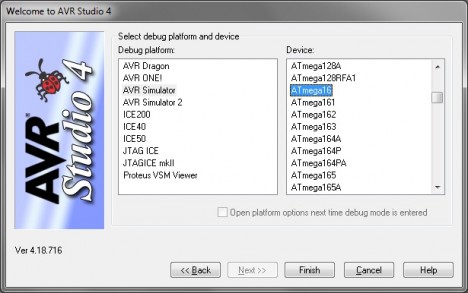
Here you can create two types of Projects – ASM and C. As we want to create a C project, select AVR GCC option. Select a location where the project will be stored. It is good practice to Create a folder where all project files will be stored, and if creating a new program, then create an initial file (it can also be created later). If you are set here, then click Next button. In the next window, things become more attractive as here you have to select a debugging platform and AVR chip:
As we are not using any hardware debuggers, select AVR Simulator for software debugging and choose your device. I’ve chosen the ATmega16. Click Finish to go to the editor. Before writing code, lets configure necessary settings so we can adequately compile the code. Go to menu Project->Configuration Options.
Here you can see a bunch of settings. Select the device (Atmega16) and enter the frequency of the oscillator. Make sure that there is a checkbox Create Hex File marked – this will generate hex file ready to upload to chip. Click OK to save, and let’s write a simple program.
#include <avr/io.h>
#include <util/delay.h>
int main (void)
{
    DDRB = 0x01; //set PB0 pin as output
    while(1) //loop for ever
    {
        PORTB =0x00; //turn LED ON
        _delay_ms(1000); //wait 1s
        PORTB =0x01; //turn LED OFF
        _delay_ms(1000);//wait 1s
    }
    return 0;
}
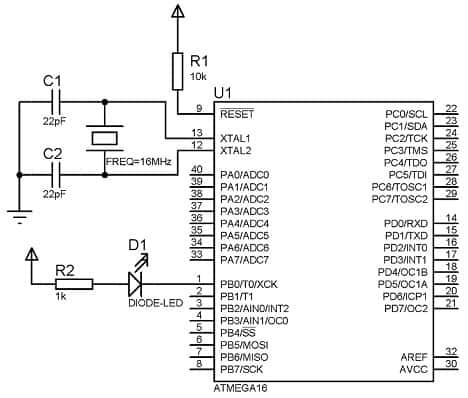
This elementary and straightforward program will blink a single LED connected to PB0 pin of B port. This is only to show the building process, so don’t care too much about the program itself. The circuit is simple as well:
When the code is entered, you can build the project. Go to menu Build->Build, and you should compile it without errors and see the message below:
Build started 18.10.2010 at 23:11:48

AVR Memory Usage
----------------
Device: atmega16

Program:     156 bytes (1.0% Full)
(.text + .data + .bootloader)

Data:          0 bytes (0.0% Full)
(.data + .bss + .noinit)

Build succeeded with 0 Warnings...
If you go to the project folder, in default sub-folder, you will find your hex file that can be programmed to your chip. How to flash the chip and debug, we will discuss later. Now you should know how to compile a simple program in AVRStudio.
Updated Conclusion!
Although newer development tools and technologies continue to emerge, older tools for microcontroller development may still be helpful in certain situations. Even if a tool is considered obsolete or no longer maintained, the code written using that tool can often be adapted and used successfully in new environments.
One of the primary reasons to continue using older tools is that they may be more suitable for specific systems or use cases. For example, if a project is constrained by limited resources, an older toolchain may be more efficient in terms of memory usage and processing time. In some cases, using an older toolchain may be more cost-effective than upgrading to a newer one, especially if the project is small or doesn’t require the latest features or functionality.
Another reason to continue using older tools is that the code written using these tools may be more easily adapted to new environments. Even if an older toolchain is no longer supported, the code written using that toolchain may be portable and adaptable to newer environments. This is especially true for code written in C or C++, which is often highly portable across different platforms and toolchains.
One example of an older tool that is still widely used in microcontroller development is the Arduino IDE. While the Arduino IDE is not as powerful or feature-rich as newer IDEs, it is still popular among hobbyists and students due to its simplicity and ease of use. Furthermore, the code written using the Arduino IDE can be easily adapted to other environments, such as MPLAB X IDE or Atmel Studio, which are more powerful and feature-rich.
Similarly, the WinAVR toolchain, which was popular in the early days of AVR microcontroller development, can still be used in certain situations. While it may not be the best option for larger, more complex projects, WinAVR may be suitable for smaller projects or for developers who are more comfortable with its particular toolchain. The code written using WinAVR can also be adapted to other environments, such as MPLAB X IDE or Atmel Studio, as long as the appropriate modifications are made.
In conclusion, while newer development tools and technologies are constantly emerging, older tools for microcontroller development may still have their place in certain situations. The code written using these tools can often be adapted and used successfully in new environments, enabling leveraging the benefits of both old and new technologies. Developers should consider their projects’ specific needs before deciding which tools to use, and should not discount the value of older tools and the code written using them.


thanks for the article
btw, i think C1 and C2 are missing connections to ground in the schematic
Oops! Thanks for showing this. Fixed.
hi i did all u said but i keep getting errors when i compile
i named the project as flash it keeps popping
avr-objcopy: ‘flash.elf’: No such file
make: *** [flash.hex] Error 1
Build failed with 1 errors and 0 warnings…