The Internet of Things (IoT) is a new and intelligent way to facilitate designing, developing control, and monitoring devices and services. Through IoT, all the controlling and monitoring can be done remotely through the internet. IoT-based systems are now introduced in almost every field, including smart homes, smart offices, smart cities, smart hospitals, intelligent vehicles, etc.
The IoT-based projects need a controlling unit for their implementation. There are a large number of design boards available in the market for IoT projects, i.e., microcontroller boards (like Arduino board, ESP8266), single-board computers (like Raspberry pi board), and System on Chip (SoC) boards (like Tessel 2, Intel Edison board). All these boards have different specifications and are selected based on the requirements of IoT projects.
IoT-based hardware exchanges information by connecting with other devices through any of the following connectivity radio frequency, Internet, Wi-Fi, Ethernet, Bluetooth, etc.
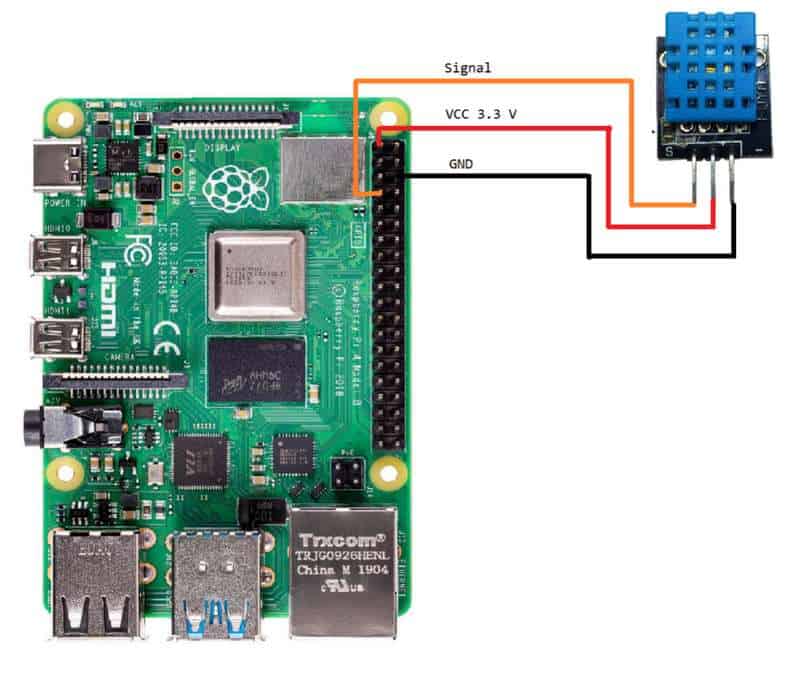
The current project is a temperature and humidity monitoring system it uses a Raspberry pi board as a standalone controller connected to the DHT11 sensor. The sensor collects information from the physical environment. It provides it to the Raspberry pi board that processes this data and sends the information to the cloud using the Thingspeak platform via the internet. Where the data can be stored, and it is used for further action after visualization and analysis.
Hardware Components: Raspberry pi board with SD card, DHT11 temperature and humidity sensor, Breadboard, resister, and jumper wires. The finished Turnkey PCB assembly is obtained through AiPCBA, and his service was also used to purchase components.
Raspberry Pi Board

Raspberry pi board IoT board is used in this project. It is the core component in IoT-based temperature and humidity monitoring system projects. Raspberry Pi is a small computer fixed on a credit card size chip, which is comparable to the Arduino board. It is very flexible in use, and these days, it is being used in most IoT-based projects. It is a complete package SoC with memory, a processor, and a graphic card. It has 40 pins and more General purpose inputs and outputs (GPIO) pins than other pins. Raspberry pi boards are of different versions and models available in the market. The model and version are selected based on the project’s requirements in which they are being used. It has HDMI support, a USB connection port, and a board Wi-Fi and Bluetooth facility; these connections exchange information between devices and things in IoT projects. Each version is becoming smarter with more power and higher performance. The raspberry pi is usually programmed in python and scratch languages. It has USB connections for power supply, mouse and keyboard and HDMI for monitor or display connection. For storage, it contains a
GPIO pins of Raspberry pi board

ThingSpeak Analytics Platform for IoT
ThingSpeak is an open-source platform for IoT services. It is an analytical platform that facilitates the users to store the live data in the cloud. It also provides the facility to aggregate and analyze the data and visualize it properly. The user can send the data from the device to the ThingSpeak cloud, quickly visualize the live information, and take further decisions based on live data. It can be easily accessed through the internet. It is a platform for data collection, data processing, and device management for IoT devices and IoT-based projects. This collected data and supported visualization of data on the real-time dashboard of ThingSpeak. It helps in monitoring and controlling IoT-based devices using rich server-side API. It helps in creating relationships between our devices and other entities. This project is used to store the data readings of temperature and relative humidity and can be live visualized by the user.
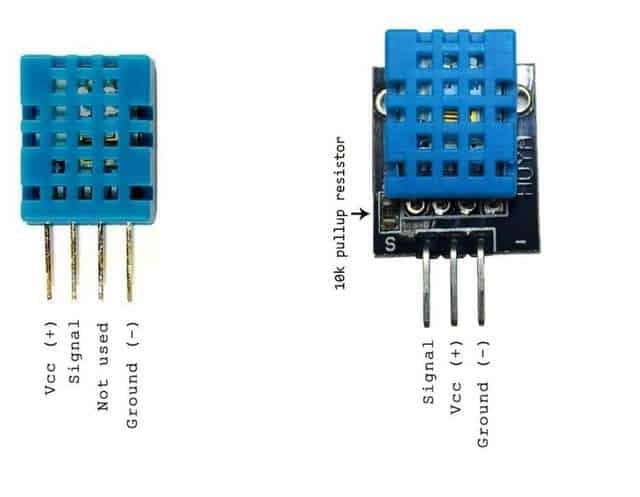
DHT11 Temperature and Humidity Sensor
DHT11 is a digital sensor used to measure temperature and relative humidity. It is simple, low-cost, and easy to use. For temperature measurement, it uses a thermistor, and for humidity, it uses capacitive resistance. It is readily available and can be interfaced with Raspberry Pi and other microcontrollers like Arduino. It is low power, and its voltage range is 3.3V-5V.
Circuit Connections

Steps:
- Setup raspberry pi
- Make connections as shown in the figure
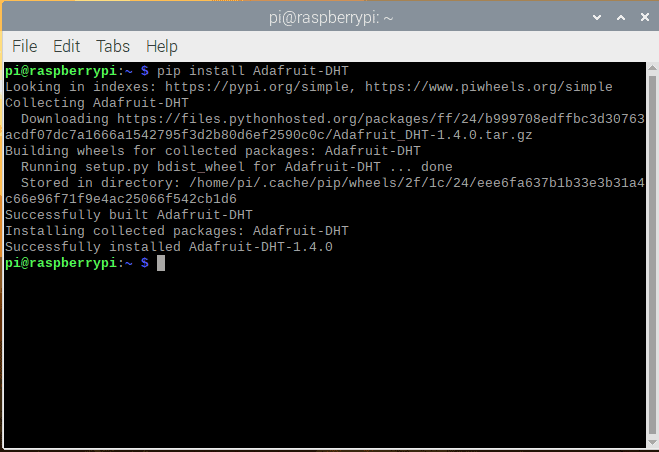
- Install the Adafruit-DHT library from Adafruit.
>> pip3 install Adafruit-DHT
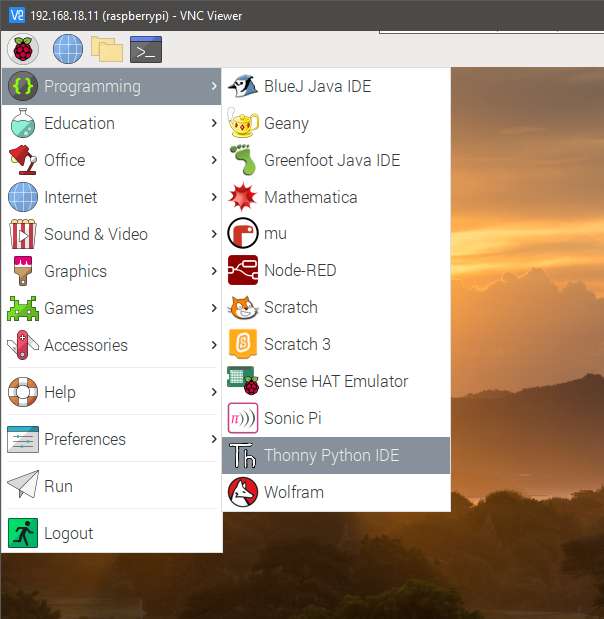
- Open Thonny python editor to write python code
Code reads the temperature and humidity readings and sends them to ThingSpeak IoT cloud.

Code explanation
Import required libraries:
import RPi.GPIO as GPIO
from time import sleep
import Adafruit_DHT
import urllib.request
import requests
import threading
import json
from time import sleep
Set GPIO to use BCM mode. Replace the text with your ThingSpeak API key:
GPIO.setmode(GPIO.BCM)
DHTpin = 4
KEY = "***write your ThingSpeak API key here***"
myDelay = 15
Define a function to read temperature and humidity readings:
def getSensorData():
    humidity, temperature = Adafruit_DHT.read_retry(Adafruit_DHT.DHT11, DHTpin)
    return humidity, temperature
Define a function to send sensor readings to your ThingSpeak channel:
def thingspeak_post(temp,humidity):
    threading.Timer(15,thingspeak_post).start()
    URl='https://api.thingspeak.com/update?api_key='
    HEADER='&field1={}&field2={}'.format(temp,humidity)
    NEW_URL = URl+KEY+HEADER
    print(NEW_URL)
    data=urllib.request.urlopen(NEW_URL)
    print(data)
Run the main function:
if __name__=='__main__':
    temp,humidity=getSensorData()

    thingspeak_post(temp,humidity)
    sleep(myDelay)
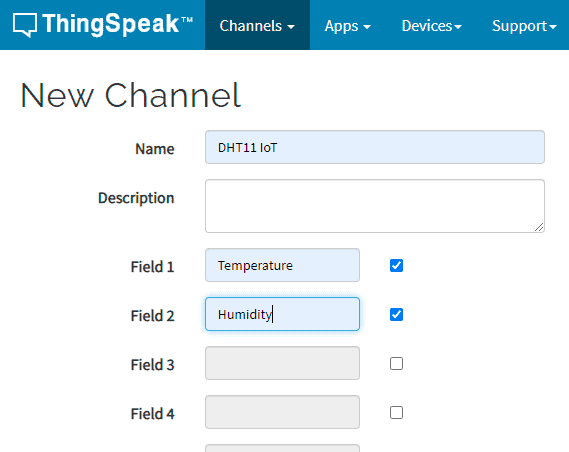
We need to create ThingSpeak Channel to upload sensor readings. Go to https://thingspeak.com/ and log in with your account. If you don’t have an account, create signup to ThingSpeak. Create a new channel, write the channel name, select the checkbox for Field 1 and Field 2, and click on Save Channel. Go to API Keys to get your API key.
After running the python program sensor, data will start to upload on the ThingSpeak IoT cloud. You can visualize the data by going to your channel.
